
SS LeadFoot
-
Posts
448 -
Joined
-
Last visited
-
Days Won
2
Reputation Activity
-


-
SS LeadFoot reacted to RayS in Finished My Ceramic Coating .... Finally
Hi Seth, That sure does look great. Given the number of Red vehicles that I've done and many of them from the GM product lines, I think you absolutely nailed it.
-
-
 SS LeadFoot got a reaction from Dan@Adams in Finished My Ceramic Coating .... Finally
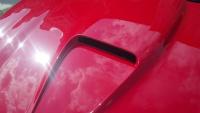
First let me say a BIG thank you to everyone on this board for your help but a Special BIG thank you to Dan@Adams. He was able to help me behind the scene and gave me the extra confidence I needed to attempt this.
So I did it. After washing, claying, paint correcting, touch up paint,, then the ceramic process I am done. I will say this, When I first finished I was a little disappointed. When I was paint correcting I used too much compound and it exposed a lot of rock chips that were not as visible as before because of the white compound getting in there. No big deal a oft of those came out when I used the spray prep. The ceramic was not as hard to apply as I thought. It smells horrible though. I did it in my garage and it was very humid. Took about 3.5 minutes to be able to wipe it off. Once I was don, or so I thought, I pulled it outside. This was the best thing I did. I saw immediately all the spots I missed when removing. Some were easy to get off others were not. Took a long time to get it right. Not sure if I did it right but I would try and buff them off and if that didn't work I reapplied ceramic and wiped down after about 40 seconds to a minute. My initial thought was I wasn't going to like the end result. I was sure I messed it up in a lot of areas. I pulled it out this morning to apply the boost and was really happy with the result. all the areas that thought were going to be bad seemed to have disappeared. There are a few small areas that I will follow up with BG to address. The beading is amazing! I haven't touched it with water yet but while spraying the boost on it dripped right off the car. I had to spray the towel and then wipe for the boost to stay.
I would say the ceramic only part took me a little over 5 hours. The car looks amazing don't get me wrong, just not sure I would do this again. I will have to wait to see how long this last.
Some helpful tips and tricks that I learned:
I started with the roof and worked my way down. Found this helpful so I knew were I was going. I also used a stopwatch. I timed how long the roof took to cure to wipe then timed each other section accordingly. I figured if I messed up the roof who cares
The stop watch helped me a lot because after a minute I wanted to remove it because it felt like 3 minutes
Don't put ceramic on the pad while standing over the car.
A detail cart would have helped big time.
Get your bucket to sit on.
I used three applicator pads. Well really only 2 but I dropped one so I threw it away. I turned the applicator every section.
Best thing I did was move it into the sun after I was done to see where I missed.
Let me know your thoughts
Last two pics are after the ceramic was applied and was in the garage. First 5 are from after the 2 hours plus boost.
-
 SS LeadFoot got a reaction from tlbullet in Finished My Ceramic Coating .... Finally
First let me say a BIG thank you to everyone on this board for your help but a Special BIG thank you to Dan@Adams. He was able to help me behind the scene and gave me the extra confidence I needed to attempt this.
So I did it. After washing, claying, paint correcting, touch up paint,, then the ceramic process I am done. I will say this, When I first finished I was a little disappointed. When I was paint correcting I used too much compound and it exposed a lot of rock chips that were not as visible as before because of the white compound getting in there. No big deal a oft of those came out when I used the spray prep. The ceramic was not as hard to apply as I thought. It smells horrible though. I did it in my garage and it was very humid. Took about 3.5 minutes to be able to wipe it off. Once I was don, or so I thought, I pulled it outside. This was the best thing I did. I saw immediately all the spots I missed when removing. Some were easy to get off others were not. Took a long time to get it right. Not sure if I did it right but I would try and buff them off and if that didn't work I reapplied ceramic and wiped down after about 40 seconds to a minute. My initial thought was I wasn't going to like the end result. I was sure I messed it up in a lot of areas. I pulled it out this morning to apply the boost and was really happy with the result. all the areas that thought were going to be bad seemed to have disappeared. There are a few small areas that I will follow up with BG to address. The beading is amazing! I haven't touched it with water yet but while spraying the boost on it dripped right off the car. I had to spray the towel and then wipe for the boost to stay.
I would say the ceramic only part took me a little over 5 hours. The car looks amazing don't get me wrong, just not sure I would do this again. I will have to wait to see how long this last.
Some helpful tips and tricks that I learned:
I started with the roof and worked my way down. Found this helpful so I knew were I was going. I also used a stopwatch. I timed how long the roof took to cure to wipe then timed each other section accordingly. I figured if I messed up the roof who cares
The stop watch helped me a lot because after a minute I wanted to remove it because it felt like 3 minutes
Don't put ceramic on the pad while standing over the car.
A detail cart would have helped big time.
Get your bucket to sit on.
I used three applicator pads. Well really only 2 but I dropped one so I threw it away. I turned the applicator every section.
Best thing I did was move it into the sun after I was done to see where I missed.
Let me know your thoughts
Last two pics are after the ceramic was applied and was in the garage. First 5 are from after the 2 hours plus boost.
-
 SS LeadFoot got a reaction from Captain Slow in Finished My Ceramic Coating .... Finally
First let me say a BIG thank you to everyone on this board for your help but a Special BIG thank you to Dan@Adams. He was able to help me behind the scene and gave me the extra confidence I needed to attempt this.
So I did it. After washing, claying, paint correcting, touch up paint,, then the ceramic process I am done. I will say this, When I first finished I was a little disappointed. When I was paint correcting I used too much compound and it exposed a lot of rock chips that were not as visible as before because of the white compound getting in there. No big deal a oft of those came out when I used the spray prep. The ceramic was not as hard to apply as I thought. It smells horrible though. I did it in my garage and it was very humid. Took about 3.5 minutes to be able to wipe it off. Once I was don, or so I thought, I pulled it outside. This was the best thing I did. I saw immediately all the spots I missed when removing. Some were easy to get off others were not. Took a long time to get it right. Not sure if I did it right but I would try and buff them off and if that didn't work I reapplied ceramic and wiped down after about 40 seconds to a minute. My initial thought was I wasn't going to like the end result. I was sure I messed it up in a lot of areas. I pulled it out this morning to apply the boost and was really happy with the result. all the areas that thought were going to be bad seemed to have disappeared. There are a few small areas that I will follow up with BG to address. The beading is amazing! I haven't touched it with water yet but while spraying the boost on it dripped right off the car. I had to spray the towel and then wipe for the boost to stay.
I would say the ceramic only part took me a little over 5 hours. The car looks amazing don't get me wrong, just not sure I would do this again. I will have to wait to see how long this last.
Some helpful tips and tricks that I learned:
I started with the roof and worked my way down. Found this helpful so I knew were I was going. I also used a stopwatch. I timed how long the roof took to cure to wipe then timed each other section accordingly. I figured if I messed up the roof who cares
The stop watch helped me a lot because after a minute I wanted to remove it because it felt like 3 minutes
Don't put ceramic on the pad while standing over the car.
A detail cart would have helped big time.
Get your bucket to sit on.
I used three applicator pads. Well really only 2 but I dropped one so I threw it away. I turned the applicator every section.
Best thing I did was move it into the sun after I was done to see where I missed.
Let me know your thoughts
Last two pics are after the ceramic was applied and was in the garage. First 5 are from after the 2 hours plus boost.
-
SS LeadFoot reacted to Dan@Adams in Q: *new user* Cleaning product recommendations?
Hi ADG, welcome to the forum!
The MTM PF22 is different brand of Foam Cannon, manufactured by MTM in Italy. It's a quality tool. Both will perform similarly and provide thick foam on the vehicle with the right pressure washer. You will need a pressure washer with a 1/4" female quick connect, and one with 1.3gpm or higher will perform better. Right now, our Limited Foam Cannon that we brought out for Black Friday is an affordable nice option, with a free bottle of Mega Foam to get you started:
https://adamspolishes.com/collections/exterior-washing-foam-guns-foam-cannons/products/adams-limited-foam-cannon
We have all of the safe wash accessories that you will need. I would definitely recommend watching some of our videos. Adam makes the process easy to understand, safe, and fun. Here are the most common accessories I use while washing:
- Soap & Rinse Two Bucket Combo
- Microfiber Wash Mitt
- Premium Microfiber Sponge
- Wheel & Tire Cleaner Trio
- Ultra Plush Drying Towel
-
 SS LeadFoot got a reaction from vm1971 in CS3
So I washed the wife's car on Mother's day and it sat outside for a week. It was supposed to rain the weekend after so I decided to run outside and try the CS3and see how It does. Disclaimer, the wife's car has no protection on it. It hardly get washed. I left 1 door untreated to see if I could see a difference. Before it rained I could feel a difference and see a difference. Well it rained today. First pic is the door not treated. 2nd pic is treated. It is an amazing product considering all the beading you see is all because of CS3. Before it didn't bead AT ALL. Last pic is glass sealant. Love that also
-
SS LeadFoot got a reaction from Dan@Adams in Anyone figure out Adams Covid Masks?
Ok first congrats on the baby girl! I love the name Madelyn. The wife and I are expecting our 2nd girl in July and trying to come up with names.
2nd, Glad everyone is doing good. Hope you are getting some sleep.
3rd, I love how we can't remember people's names but we know what they drive
-
SS LeadFoot got a reaction from Dan@Adams in Anyone figure out Adams Covid Masks?
Hope everything is ok Nick!
-
-
 SS LeadFoot got a reaction from Nickfire20 in Anyone figure out Adams Covid Masks?
Ok first congrats on the baby girl! I love the name Madelyn. The wife and I are expecting our 2nd girl in July and trying to come up with names.
2nd, Glad everyone is doing good. Hope you are getting some sleep.
3rd, I love how we can't remember people's names but we know what they drive
-
-
SS LeadFoot reacted to Kaiten in Adams polishes diecast
Lol they have a smaller hot wheel size for like $8 and another one the same as the $100, just not as finely detailed for $50
-
 SS LeadFoot got a reaction from Kaiten in Adams polishes diecast
Man almost $100! Do you know how much Adams I can buy with that!
-
SS LeadFoot got a reaction from Nickfire20 in Anyone figure out Adams Covid Masks?
Hope everything is ok Nick!
-
 SS LeadFoot got a reaction from NuNu in CS3
So I washed the wife's car on Mother's day and it sat outside for a week. It was supposed to rain the weekend after so I decided to run outside and try the CS3and see how It does. Disclaimer, the wife's car has no protection on it. It hardly get washed. I left 1 door untreated to see if I could see a difference. Before it rained I could feel a difference and see a difference. Well it rained today. First pic is the door not treated. 2nd pic is treated. It is an amazing product considering all the beading you see is all because of CS3. Before it didn't bead AT ALL. Last pic is glass sealant. Love that also
-
SS LeadFoot reacted to Dan@Adams in CS3
Awesome! Thank you for sharing the pictures Seth.
Brilliant Glaze used to be my favorite product, now it's Ceramic Spray Coating, but CS3 is quickly moving near the top of my list for favorite products now too 🙂
-
 SS LeadFoot got a reaction from kaj41354 in CS3
So I washed the wife's car on Mother's day and it sat outside for a week. It was supposed to rain the weekend after so I decided to run outside and try the CS3and see how It does. Disclaimer, the wife's car has no protection on it. It hardly get washed. I left 1 door untreated to see if I could see a difference. Before it rained I could feel a difference and see a difference. Well it rained today. First pic is the door not treated. 2nd pic is treated. It is an amazing product considering all the beading you see is all because of CS3. Before it didn't bead AT ALL. Last pic is glass sealant. Love that also
-
 SS LeadFoot got a reaction from RayS in CS3
So I washed the wife's car on Mother's day and it sat outside for a week. It was supposed to rain the weekend after so I decided to run outside and try the CS3and see how It does. Disclaimer, the wife's car has no protection on it. It hardly get washed. I left 1 door untreated to see if I could see a difference. Before it rained I could feel a difference and see a difference. Well it rained today. First pic is the door not treated. 2nd pic is treated. It is an amazing product considering all the beading you see is all because of CS3. Before it didn't bead AT ALL. Last pic is glass sealant. Love that also
-
SS LeadFoot reacted to RayS in Swirl Killer Questions
Hi Seth, The q-tip will tend to leave fuzz behind that will mess with your LSP. The fuzz can be more difficult to get off than the polish remnants. If you can't use the edge of a microfiber towel, then you may need to go with a plastic razor blade or plastic toothpick.
-
SS LeadFoot got a reaction from Nickfire20 in Swirl Killer Questions
Ray that is a great idea about cutting them and using them in different areas. Here are a few pics. Thanks everyone for all you input. I was extreamely nervous about using the swirl killer. You have made it a lot easier.
First 2 pics are before the next 2 are after
-
SS LeadFoot got a reaction from Nickfire20 in Swirl Killer Questions
Thanks! I have some spots that are worse than others. My spoiler and trunk are the worst. Back bumper doesn't have any scratches but you can see a little bi and feel a lot that it is not smooth even after clay. Hope to be able to try this on Sunday. I will try and take some 50/50 shots of the spoiler. Might be hard to see the swirls though.
-
SS LeadFoot reacted to The Guz in Swirl Killer Questions
Either one will be fine. I would still recommend some sort of prep wipe to remove any surfactants left behind by either one.
-
SS LeadFoot reacted to BRZN in Swirl Killer Questions
You don't need to wash the car after polishing, any remaining water will mess with your LSP. The Surface Prep will remove any oils from the polish that remains on the paint surface. It will leave you perfectly clean paint, ready for your chosen LSP.


